|
You install the
DizzyAGE devtools,
by unpacking the dizzyage.zip archive in the desired folder on your hard disk,
for example in C:\DizzyAGE. The development tools contain the DizzyAGE map editor discussed in this book, a few other tools and
a game folder reffered as the default template.
It is the starting point for all the DizzyAGE games you make and it contains game data, including a default set of tiles,
representing most of the classic Dizzy games graphic elements.
The options dialog
When you
start the editor
for the first time, you may want to open the Options dialog,
to do some first time settings. You can access this dialog from the editor's
system menu.
If the editor doesn't start on your computer, or if it has display difficulties,
it may be because of an incompatibility with your video board or with your video drivers.
You may still have a chance, because the editor supports both DirectX and OpenGL.
Edit the editor.ini in a text editor and set options_videoapi to 1 instead of 0 to use OpenGL instead of DirectX.
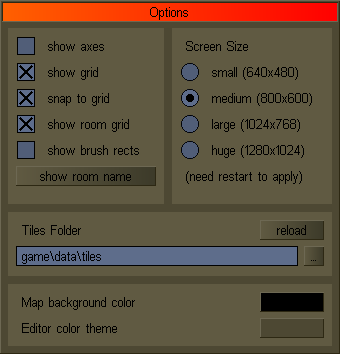
The Options dialog allows you to configure editor's setting, like show axes,
that will display a vertical and a horizontal axis at the cursor position for easy aligniament,
show grid, that will display a 8x8 pixels grid over the map editing area,
snap to grid, that will make the mouse cursor to snap from 8 to 8 pixels during editing operations.
The show brush rects option will display a debug rectangle around each brush to
help you spot invisible brushes (with transparent content).
You can also choose what kind of information to show in the bottom-right corner.
The Screen Size will set the size of the editor window. If you have the Windows desktop set in a higher resolution,
you may want to choose a bigger screen size for the editor, so you can see more of the map. Changing this
screen size will require you to restart the editor.
Colors for the map's background or for the editor's inteface can be choosed too.
The Tiles Folder is the folder from where the editor reads all the tile files used to create the game's map.
Tile files must be named using the convention discussed in the previous chapter.
You can either set a full path to the tiles folder,
like c:\DizzyAGE\Game\Data\Tiles or, you can set a path relative to the editor's location,
like Game\Data\Tiles.
All the tiles used in the game's map should be placed inside
the Data\Tiles path, relative to the game's executable (dizzy.exe), as in the default template.
Any other tiles outside this path will be ignored by the game.
It is recomended that you set this Tiles Folder to point to the tiles folder of the game you create the map for.
That is because each game can have it's own set of particular tiles, that may be more than the set offered by default.
If a tile used in a map can't be found in the tiles folder, the editor will display an emptry rectangle instead,
letting you know you are missing a tile file from the current tile's folder.
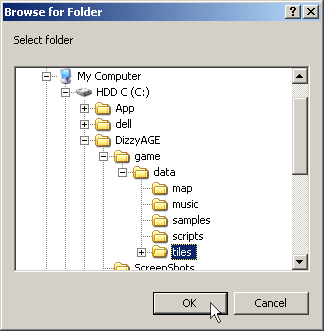
You can also choose to browse for the Tiles Folder by clicking on the small button next to the edit text line.
A standard browse dialog box will open, allowing you browse the folders from your hard disk and select the one you want.
Avoid setting bad paths like C: for the tiles folder, because the editor will start searching tiles
on all your C: hard disk drive, and that might take a very long time. Edit the editor.ini file manually if necessary to correct it.
After setting this Tiles Folders you must hit the reload button, to acctually reload
the tiles from the specified folder. The editor will let you know how many tiles it successfully loaded.
Then you are ready to use them.
You can close most of the editor dialogs either by using the accept or cancel buttons, by clicking with the mouse outside their
rectangular area, or by pressing the [escape] key.
These editor's settings are remembered in the editor.ini file saved in the same folder with the editor executable.
You can safely delete this file to reset the editor's settings to the default values.
Files operations
From the editor's system menu you can also perform map file operations.
You can create a new map,
save the current one on your hard disk, or
load a previous saved map file.
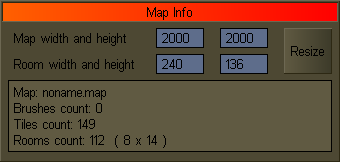
When starting a new map, the map info dialog is opened.
Here you can read information about how many tiles are currently loaded, about the
size of your map's world size (in pixels), about the rooms width and height (also in pixels)
and about how many rooms your map has.
In the info dialog, you can also change the size of your map.
In classic Dizzy games, the room's size is usually 240x136 pixels, but you can select different values for room's width and height.
Consider that the limit room size for DizzyAGE games is
256x192 pixels.
(note: since DizzyAGE v2.4 you can create games with larger rooms - check the articles.)
Click the resize button after you set the desired sizes for map and rooms, in pixels.
You can open this info dialog anytime and you can choose to change a world's size even while editing the map.
If you select a bigger size, the map will be expanded with empty space to the right and/or to the bottom.
But take care, if you choose a smaller size than the current world's size, the left and/or bottom parts of your world
will be cut off, and you may loose content of those parts!
Growing the room's size will result in less rooms for the current map size.
So, even if no brushes will be lost, you will loose the properties for the rooms left outside the world,
like room's names or other data. That's why it's best to decide the room size at the begining of your map.
To be loaded by the game engine, the map file must be named dizzy.map and it must stay
in the Data\Map folder, relative to the game's executable. DizzyAGE games can also use
multiple map files, but that is reserved for advanced users.
Conclusion
In this chapter you have learned about the editor's settings and the options dialog,
about how to set the tiles folder.
You also have learned how create a new map, how to load and save map files and how resize the current world.
Next you will learn about brushes.
|
|